How to add a transparent watermark to images
Including a visible (semi-transparent) watermark to digital pictures is a useful technique for protecting photos and other images that you publish online.
A watermark is a faint image or text that is permanently included in the image file, marking it as your work. It is a good way to deter copying of your images as anyone seeing the image can immediately see that it is your work.
How to add a watermark to an image file.
Image editing software
You will need image manipulation software, there are lots of options available from very basic image editors to paid for commercial products such as Adobe Photoshop. As long at it supports layers and opacity, the following steps should work (with a few adjustments).
For this example, we will be using a product called the GNU Image Manipulation Program (GIMP for short). We have chosen this product because:
-
It is available on all major desktop platforms (Mac, Windows, Linux),
-
It has a good set of features,
-
It is completely free software.
You can download GIMP from https://www.gimp.org/
Adding the watermark to one image
Start the application, and from the file menu, select open and select the photo you want to use.
-
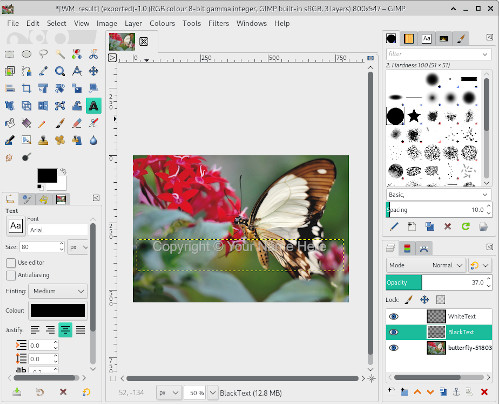
Press the Text tool (this looks like a capital “A” in the block of icons in the top left pane). You should then be able to draw a text box on the screen.
-
Now you can enter the text you want, and choose the font size and colour to suit your needs (we chose white).
The user interface can seem a little clunky, for example you have to select the text before you can change it, but you will soon get used to this with a little practice.
To get a copyright symbol, you will need to copy it from elsewhere and paste into the text. -
On the layers tab, you will notice that a new layer has been created for the text. You can now adjust the “Opacity” slider to fade out the text to a level where the text is clear, but does not distract too much from the image.
-
Play around with size and where the text appears until you are happy with the result.
-
In the image we used, it was hard to see the text in places, so we have duplicated the text layer, making the one at the back black and offsetting by a couple of pixels. This creates a subtle shadow effect and makes the text stand out better in the lighter areas.
-
You can also experiment with images (such as your logo) as well as plain text.
-
When you are happy with the result, from the file menu, select the “Export” option and select an image type that does not support layers, such as JPEG (.jpg) or PNG (.png).
-
The exported image will combine both the text and the image to a single layer image ready for publishing.

Bulk processing
If you have many images to mark, it is possible to create a batch script (for those technically minded), or download a 3rd party script or plugin for GIMP, to automate the process.
You may find it easier, particularly if you have to process 100’s of images to invest in a paid piece of software to automate the work. There are commercial applications, such as PhotoMarks (https://photomarks.app) that simplify the process and allow you to add your own copyright text and/or logo as watermarks to many images at once.
Final word of caution:
It is possible to remove watermarks, whilst manually removing watermarks takes considerable effort, there are several software products available that will automate the task. Watermarking should therefore be seen as a deterrent, rather than an absolute solution, and it is not a replacement for registration.